
Forex Trade Copier Pro
Forex Trade Copier Pro is a robust MT4/MT5 utility that enables real‑time trade replication across multiple accounts. With support for over 50 terminals, it offers a visual interface for easy setup, symbol mapping, and volume customization. Advanced features like reverse copying, partial closures, trailing stops, and news/event filters give traders full control, while built‑in safety options such as equity checks and drawdown limits ensure reliability. Designed for professionals managing multiple accounts or distributing trades, it combines flexibility with intuitive visual control.
Category : Trade Copiers
Version : 9.7
Updated : 2026-02-18
Key Features
Description
Forex Trade Copier Pro is a professional‑grade utility designed to simplify and enhance multi‑account trading across MT4 and MT5 platforms. Built for traders, money managers, and signal providers, it enables real‑time replication of trades across more than 50 accounts simultaneously. With its intuitive visual interface, users can easily configure master and slave connections, monitor communication strength, and adjust settings without technical complexity. Every aspect of the copying process is customizable — from symbol mapping and lot sizing to SL/TP management, partial closures, and reverse copying — giving traders complete control over how strategies are mirrored.
Beyond basic trade replication, Forex Trade Copier Pro integrates advanced risk management and automation features. Safety options such as equity checks, drawdown limits, and blocking during high‑impact news events protect accounts from excessive exposure. Traders can filter trades by magic numbers, apply trailing stops or break‑even rules, and even synchronize or close positions manually with a single click. Notifications via phone or Telegram ensure you stay informed of every transaction, while templates allow quick saving and loading of preferred configurations.
Designed for scalability and reliability, Forex Trade Copier Pro is more than just a copier — it’s a complete trade management solution. Whether you’re consolidating multiple strategies into one account, distributing trades to clients, or testing different risk profiles, this EA delivers flexibility, transparency, and professional performance. Its combination of visual clarity, robust customization, and built‑in safeguards makes it an indispensable tool for traders who demand efficiency and control in multi‑account environments.
For simpler setups or smaller copy networks, choose Easy Trade Copier EA instead of advanced customization.
Quick Tutorial:
This quick tutorial guides you step by step to set up your trade copying network. In the following section, you’ll find a detailed manual for deeper reference.
Step 1: Set Up Master Accounts
- Open MT4/MT5 and attach the EA to any chart.
- In the EA settings, choose Work Mode = Master.
- Assign a user‑defined name to the account (e.g., “Main Strategy”).
- The Master Report Panel will appear.
Step 2: Set Up Slave Accounts
- Attach the EA to a chart on the slave terminal.
- In the EA settings, choose Work Mode = Slave.
- Assign a user‑defined name to the slave account.
- The Slave Report Panel will appear.
Step 3: Create Connections (Control Panel)
- Attach the EA in Work Mode = Control Panel on any terminal.
- Click New Connection → select master and slave → configure settings.
- Customize each connection independently:
Step 4: Monitor & Manage
- Watch communication strength and account status in real time.
- Use manual sync to copy existing trades to new slaves.
- Close all trades instantly with one click if needed.
- Receive notifications via phone or Telegram for every transaction.
Detailed Manual:
Master EA Setup:
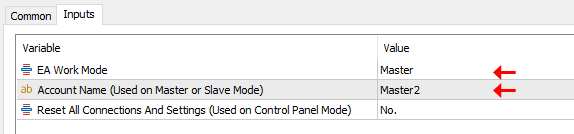
- Attach the EA to any chart and set Work Mode = Master.
- Assign a custom name to the account — this name will be used to identify it within the copy network.
- The EA can run on any chart and any timeframe; there are no restrictions.
- Use only one EA in Slave mode per account, even if that account needs to copy trades to multiple slaves.
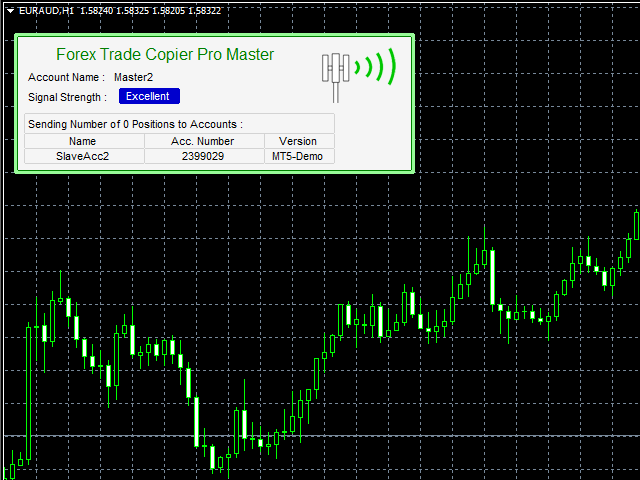
After initialization, the Master Report Panel will appear on the chart and display:
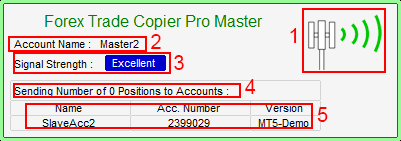
- Animated Icon – shows the EA’s status; animation confirms the EA is active and functioning correctly.
- Account Name – the user‑defined name for easy identification (editable in the EA inputs tab).
- Signal Strength – communication speed between terminals, displayed as Excellent, Good, Fair, or Weak.
- Total Positions – number of trades being sent to slave accounts.
- Connected Accounts – list of slave accounts receiving trades (initially empty until connections are established).
Repeat this procedure for each master account you wish to configure.
Slave EA Setup:
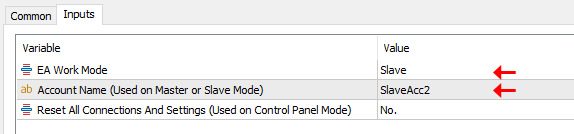
- Attach the EA to any chart and set Work Mode = Slave.
- Assign a custom name to the account — this name will be used to identify it within the copy network.
- The EA works on any chart and any timeframe; there’s no restriction.
- Use only one EA in Slave mode per account, even if the account is receiving trades from multiple master accounts.
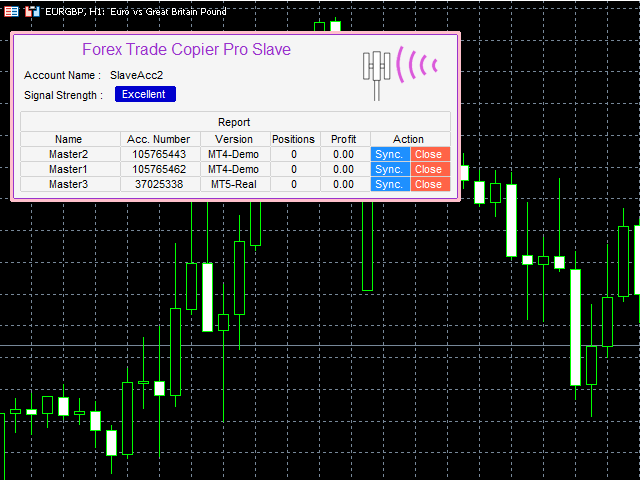
Once initialized, the Slave Report Panel will appear on the chart, displaying:
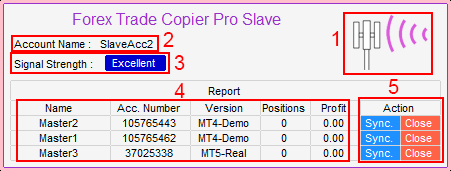
- Animated Icon – confirms EA status; animation means the EA is active and functioning properly.
- Account Name – the user‑defined name for easy identification (editable in the EA inputs tab).
- Signal Strength – shows communication quality between terminals: Excellent, Good, Fair, or Weak.
- Connected Masters – lists master accounts sending trades, along with total positions and profit from each. (Initially empty until connections are configured.)
- Synchronize & Close Buttons – allow manual syncing with master accounts or closing all positions instantly with one click.
Repeat this procedure for each slave account you wish to configure.
Setting Up Connections:
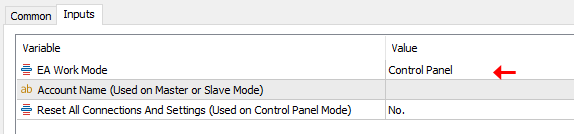
- Attach the EA to any chart and set Work Mode = Control Panel.
- The Control Panel can run on any terminal, any chart, and any timeframe — whether the account is a master, slave, or not yet assigned.
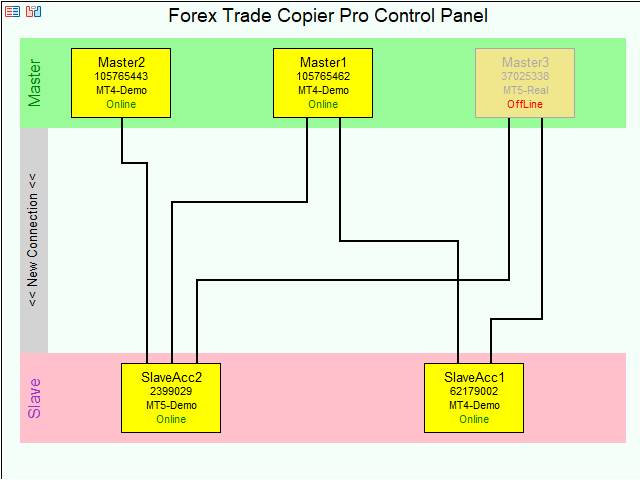
- After attaching, the copy map (network view) will appear. At first, no connections will be displayed.
On the copy map, four types of elements are shown:
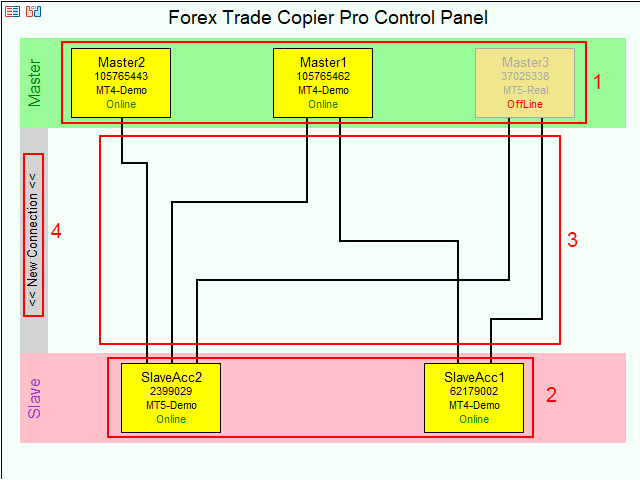
- Master Accounts – display the user‑defined account name, account number, terminal version, and online/offline status.
- Slave/Client Accounts – show the user‑defined account name, account number, terminal version, account type, and online/offline status.
- Connection Lines – represent links between accounts. Click on a line to edit its settings.
- New Connection Button – used to create a new connection.
Creating a New Connection:

- Click the New Connection button.
- In the form, select a master account and a slave account from the dropdown lists.
- Click Create Connection.
- The connection will be added to the map, and its settings will appear in the form. Adjust parameters as needed and click OK.
- Each connection line has its own independent settings, which can be modified later by clicking directly on the line.
The input parameters available in the settings dialog are described in the following sections.
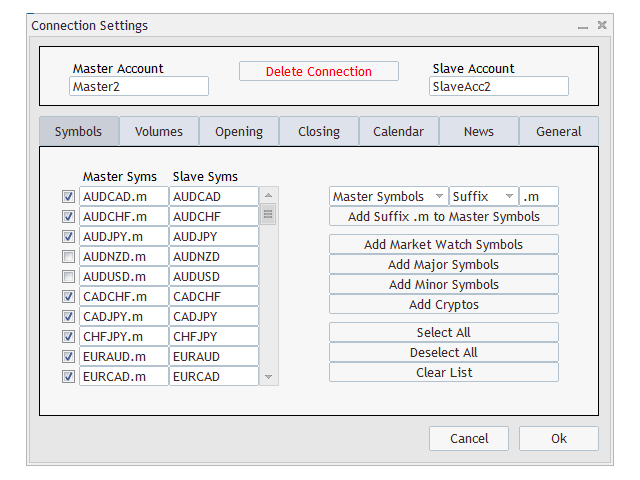
Symbols:
In this tab, you can manage how symbols are handled between master and slave accounts. You can enable or disable symbol copying, or adjust symbol names to match across accounts.
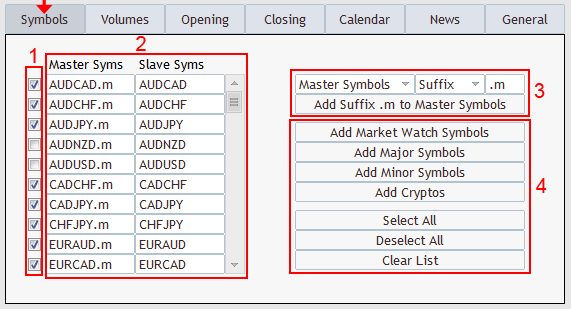
- Activation Column – toggle copying for each symbol. If a symbol is unchecked, it will be ignored and not copied.
- Symbol Mapping – add the desired symbols for the master account and their equivalents on the slave account.
- Example: if the master trades GOLD, you can set the slave to open XAUUSD.
- You can also handle cases where the master account uses a suffix and the slave does not.
- Edit each symbol directly in the input boxes. Scroll down to view additional rows.
- Batch Editing – enter inputs in the first row and apply them with the button in the second row. This allows quick batch editing of symbol names.
- Quick Inputs – additional fields are provided for easier editing and filling of symbol lists.
Managing Rows :
- Remove a Row – clear the symbol names in both the Master and Slave columns; the row will be automatically deleted.
- Add a Row – an empty row is always available at the end of the list. Enter a new symbol name in the last empty boxes, and a fresh row will be created for further addition
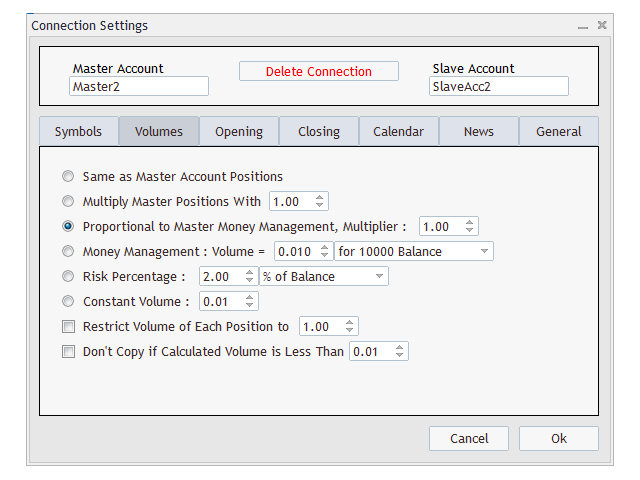
Volumes:
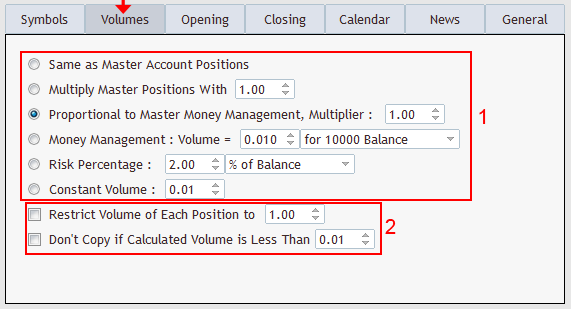
- In the Volumes tab, you can choose from six different methods to calculate trade volumes, as shown in the illustration above.
- Same as Master Account: Copies the exact lot sizes from the master account to the slave account.
- Multiplier: Applies a lot size multiplier to master trades. The multiplier can be set below 1.00 to reduce lot sizes or above 1.00 to increase them.
- Proportional to Master Money Management: Calculates lot size on the slave account based on the ratio of lot size to balance on the master account. A multiplier can also be applied.
Example: If a 0.10 lot trade opens on a master account with a $1000 balance, and the slave account has a $2000 balance, the slave trade will be 0.20 lots. This value is further adjusted by the multiplier parameter. - Custom Money Management: Allows you to define a lot size per 1000 units of balance, equity, or free margin. The EA then calculates the appropriate lot size based on the slave account’s actual properties.
- Risk Percentage: In this section, you can define the risk percentage for each trade based on account balance, equity, or free margin. Since risk calculation requires a stop‑loss, ensure that proper SL settings are applied when using this option.
- Constant Value: Opens trades on the slave account with a fixed lot size specified in the input box, regardless of the master account’s lot size.
- In this section, you can set security rules to restrict maximum lot sizes and prevent the opening of very small trades.
Opening:
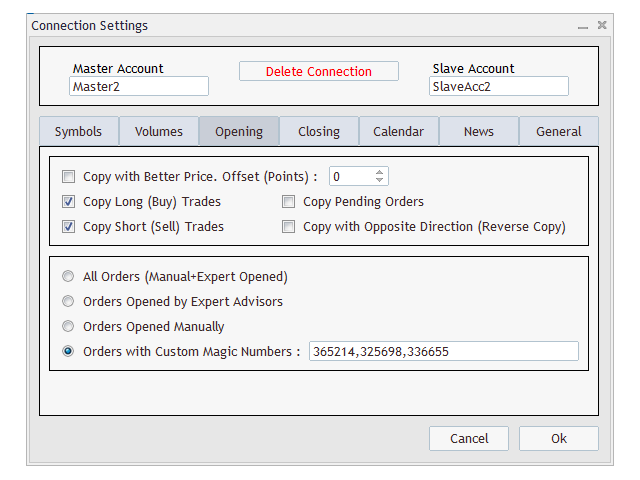
In this tab, you can configure how copied orders are opened:
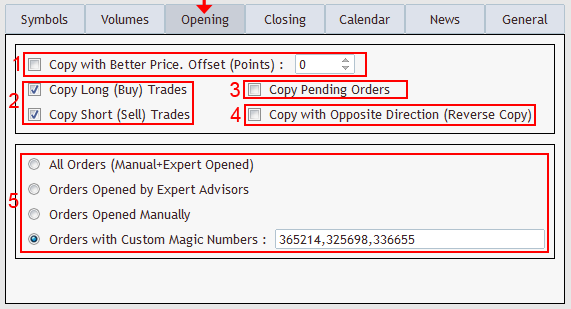
- Better Price Entry – allows the EA to place orders at improved prices. Buy trades are entered at lower prices, and sell trades at higher prices. The offset is defined in points. If the master places a market order, the EA will create a pending limit order with the specified offset in the favorable direction.
- Order Type Selection – choose whether to copy only long trades, only short trades, or both.
- Pending Order Handling – when enabled, pending orders are copied as pending orders on the slave account. If disabled, they will be opened as market orders once triggered on the master account.
- Reverse Copying – when activated, orders are copied in the opposite direction (e.g., master buy → slave sell).
- Magic Number Filtering – filter which trades are copied based on their magic numbers. You can specify multiple magic numbers separated by commas to include or exclude trades opened manually or by other EAs on the master account.
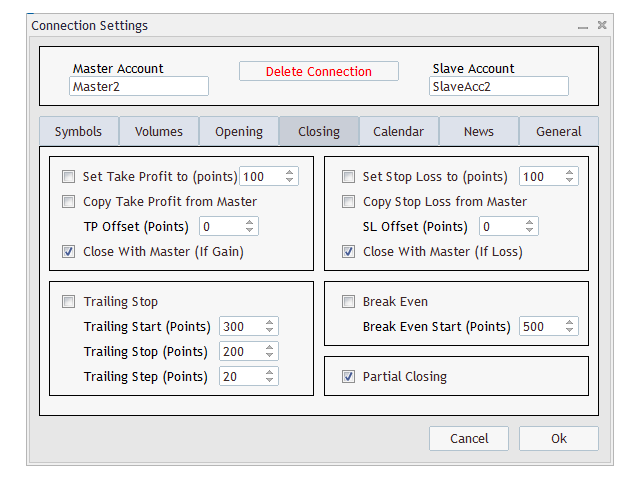
Closing:
The following options allow you to control how orders are closed on slave accounts:
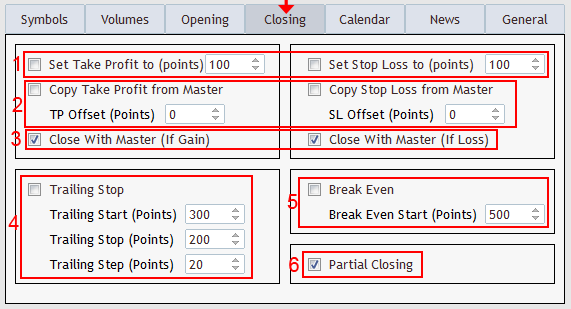
- Fixed TP/SL Points – set a predefined take‑profit and stop‑loss in points. Orders will close on the slave side once TP/SL is reached, even if the master order remains open.
- Copy TP/SL from Master – replicate TP/SL levels from the master account. If an offset is defined, the EA adjusts the master TP/SL before applying it to the slave orders.
- Synchronized Closing – when enabled, orders on the slave account close in sync with the master. If disabled (and no TP/SL is set in options 1 or 2), slave orders remain open even after the master order is closed.
- Trailing Stop – manage stop‑loss dynamically on the slave account according to the configured trailing stop settings.
- Break‑Even Option – automatically adjust TP on the slave account to secure profits once break‑even conditions are met.
- Partial Closing – replicate partial closures from the master account. If disabled, slave orders will only close once the master order is fully closed.
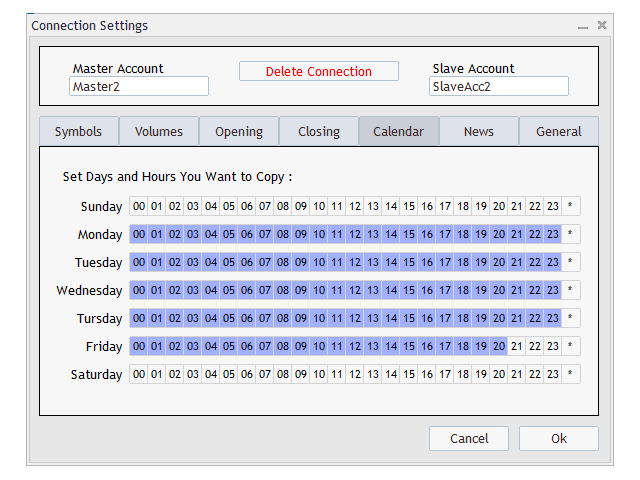
Calendar:
The Calendar tab allows you to control trade copying based on specific time periods:
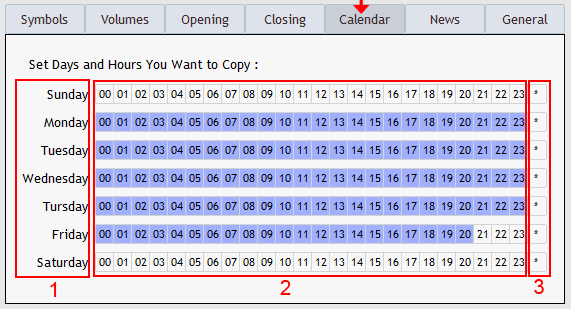
- Days of the Week – select which days copying is active.
- Time Periods – enable or disable copying by clicking in the time boxes. Blue boxes indicate trading is enabled.
- Selection Controls – use the buttons provided to quickly reverse or adjust your selections.
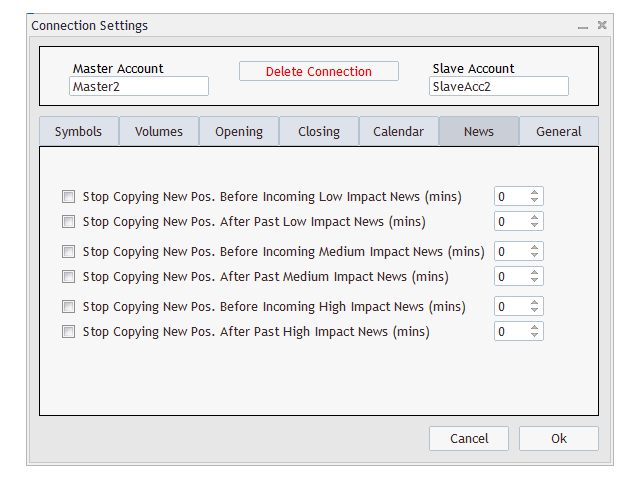
News:
The News tab allows you to control EA behavior around scheduled events:
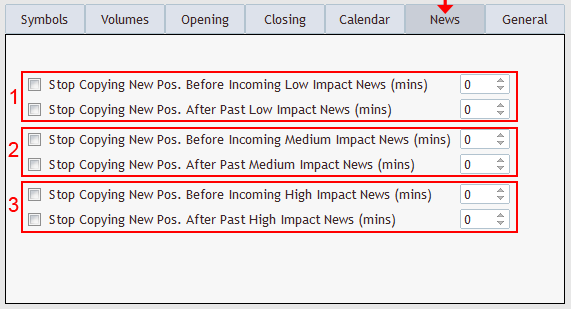
You can block trade copying for a specified number of minutes before and after news releases, based on their impact level.
- Low‑Impact News Settings – configure restrictions for minor events.
- Medium‑Impact News Settings – set rules for moderate events.
- High‑Impact News Settings – define stricter controls for major market‑moving events.
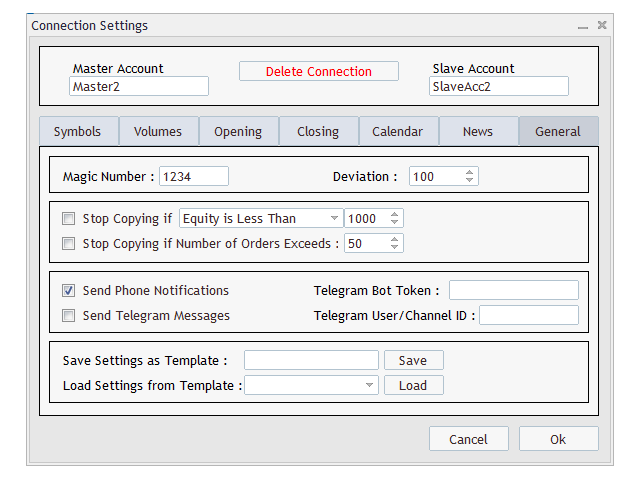
General:
The General tab collects several key configuration options:
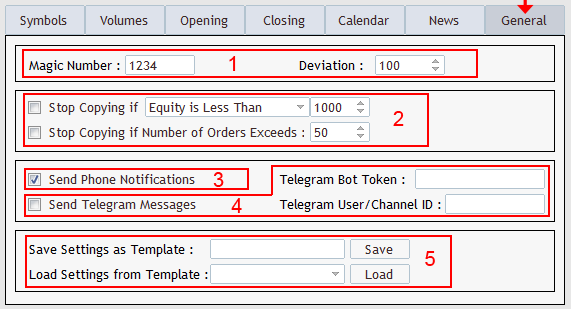
- Magic Number & Deviation – define the magic number for slave account orders and set the deviation allowed when opening trades.
- Safety Restrictions – apply protective rules for order execution.
- Phone Notifications – enable alerts for any transaction related to this connection.
- Telegram Notifications – send transaction updates via Telegram. (See How to Set Up Telegram Notifications for details.)
- Save & Load Settings – simplify network setup by saving configurations as templates. Saved templates can be reloaded later and are accessible across other connection settings.
Notes:
- Local Copier Requirement – This version is a local trade copier, meaning all master and slave terminals must be running on the same machine. For copying between different machines (PC or VPS), a remote version will be required (coming soon).
- Delete a Connection – Open the Control Panel, click on the desired connection, and select Delete Connection.
- Reset the Copier – Close all master and slave accounts (detach EAs), then run the Control Panel with reset = Yes. This will erase all connection data, templates, and account information, allowing you to set up new connections.
- Control Panel Usage – It is not necessary to keep the Control Panel active on a chart. Attach it only when you need to adjust settings, then close it afterward. If you want to continuously monitor account status (online/offline), you may leave the EA attached.
- Multiple Connections – To configure two connections with different settings between the same master and slave accounts, simply create multiple connections and adjust each one independently.
- Account Types – The EA supports both hedge and netting accounts. However, when copying from hedge to netting, some features may not be supported.
- Synchronization of Old Orders – By default, if a master account already has open positions when a new slave is started, those older trades will not be copied. To include them, enable the Synchronization option on the slave.
- MT4 Trade History – In MT4, set trade history to All History (right‑click on the Account History tab → select All History).
- Master/Slave Usage – Use only one EA in Master mode per account (even if copying to multiple slaves). Use only one EA in Slave mode per account (even if receiving trades from multiple masters).
- MT4 External Data Access – To enable external event data in MT4, go to Tools → Options → Expert Advisors tab, check Allow WebRequest, and add:
https://nfs.faireconomy.media
Need Help?
Here are some helpful resources. If you have questions or need assistance, feel free to contact us. You can submit a support ticket or leave a comment. we’ll respond as quickly as possible.
Screenshots
Pricing
New Offer Every 6 Hours up to 50%. Follow.
Testing is free. How to do?

Testing on Live
2 Days of unlimited testing
3 Accounts Activation
Full Support

1 Month
1 Month of unlimited use
3 Accounts Activation
Full Support
Free Updates
$ 40.00

3 Months
3 Months of unlimited use
5 Accounts Activation
Full Support
Free Updates
$ 55.00

6 Months
6 Months of unlimited use
10 Accounts Activation
Full Support
Free Updates
$ 70.00

1 Year
1 Year of unlimited use
15 Accounts Activation
Full Support
Free Updates
$ 85.00

Lifetime
Unlimited use, forever
20 Accounts Activation
VIP Support
Free Updates
$ 100.00
 to be a light for all traders.
The calendar based filtering helps me avoid volatile news periods. It’s a smart feature I didn’t know I needed.
I trust it with my live accounts.
I have a problem. I can not setup it to work. Can you help?
To assist you effectively, we need a few more details about what you did and the exact error message or issue you encountered. We’ve opened a support ticket for you — please reply there with all the relevant information and our team will guide you through the setup in just a few simple steps.
No more missed trades.
Can I copy trades across hedge and netting accounts?
Yes, but some features are limited when copying hedge to netting.
Feels like it was built by traders, for traders. Every feature solves a real problem I’ve faced in account management.
The trailing stop and break‑even options give me more control over risk.
How does the copier manage trades during news events?
The News tab lets you block copying for a set number of minutes before and after low, medium, or high‑impact events. This prevents exposure to volatile market conditions and protects accounts from unnecessary risk.
How does this Copier handle risk?
You can set risk percentages based on balance, equity, or free margin. Stop‑loss is required to calculate risk, ensuring trades remain controlled.
What happens if the master closes trades partially?
The copier mirrors partial closures on the slave account. If partial closing is disabled, the slave trade closes only when the master’s full volume is closed.
Smooth execution across all terminals.
If a trader wants to ensure that slave accounts close trades exactly when the master does, rather than relying only on TP/SL levels, what setting in Forex Trade Copier Pro guarantees synchronized closing?
Please adjust Stop Loss and Take Profit settings same as the attached image.
For account managers who need to run multiple strategies simultaneously, sometimes with different risk rules or symbol sets, how does Forex Trade Copier Pro allow them to configure separate setups without interfering with each other?
Simply by creating multiple independent connections. It can be between single master and single slave account and multiple masters/slaves.
Reliable copier with professional features.
Hi, If a trader wants slave accounts to enter trades at slightly better prices than the master, such as lower entries for buys or higher entries for sells, what feature in Forex Trade Copier Pro makes this possible?
Hi,
Enable better price entry with offsets on the connection settings.
Thanks. It is perfect. I purchased the EA right now.
Hi, Wide range of settings are available. Can I save settings?
Yes, templates let you save and reuse setups.
Hi,
When managing multiple EAs on the master account, each with its own magic number, how can Forex Trade Copier Pro selectively copy trades from only certain strategies?
Yes, You can adjust it on the connection settings. See the attached image :
When brokers use hedge accounts versus netting accounts, and trades must be copied between them, what does Forex Trade Copier Pro offer to handle this scenario, and what should traders be aware of?
It supports both account types, but because these account types operate differently, certain features may behave with limitations in specific situations.
The developers clearly thought through every scenario traders face. From news filtering to symbol mapping, lot sizing, graphical copy plan,…. , it’s comprehensive.
I love how I can monitor account status without keeping the control panel open. It’s flexible and efficient.
Forex Trade Copier Pro made managing multiple accounts effortless. The symbol mapping and batch editing features are incredibly intuitive.
Hi, How can I copy trades from a terminal on a PC to a terminal on another PC?
Hi, this product is a local copy system. To copy between different PCs, you’ll need the remote version, which isn’t available yet. It will be released later.
Can I run multiple connections with different settings?
Yes, you can create more than one connection between the same master and slave accounts, each with its own configuration. This allows you to tailor strategies per connection.
I’ve run it across multiple terminals for months without a single failure.
Hi, Is there a limitation on the number of terminals running on a PC?
Hi, technically there’s no built‑in limitation. The only real constraint is your system resources, which determine how many terminals you can run smoothly.
Hi, Partial closing synchronization is brilliant. It mirrors my master account exactly. I love this.
The comments section is now open. Feel free to share your feedback, reviews, questions, and personal experience with the product. You can also interact with other users and join the discussion. Our support team is active there as well and will respond whenever assistance is needed.